Secure Authentication with JWT

Imagine a web or mobile application where users log in with their email and password. After doing so, the user can view their data, perform various operations, and even navigate between different pages.
How does the server know whether a given user is still authenticated, even after they've closed the application and reopened it later?
This is where JSON Web Tokens (or "JWT") come in. It's a token-based authentication method that enables secure communication between systems.
The first step in the authentication process is to create an account. After choosing an email and a password, a request is sent to the server.
If the registration is accepted, for security reasons, the password is never stored directly in the database.
Instead of storing the password directly in the database, the server applies a process called "hashing". This process transforms the password into an apparently random string of letters and numbers.
The result is a hash that is stored in the database, associated with the corresponding user.
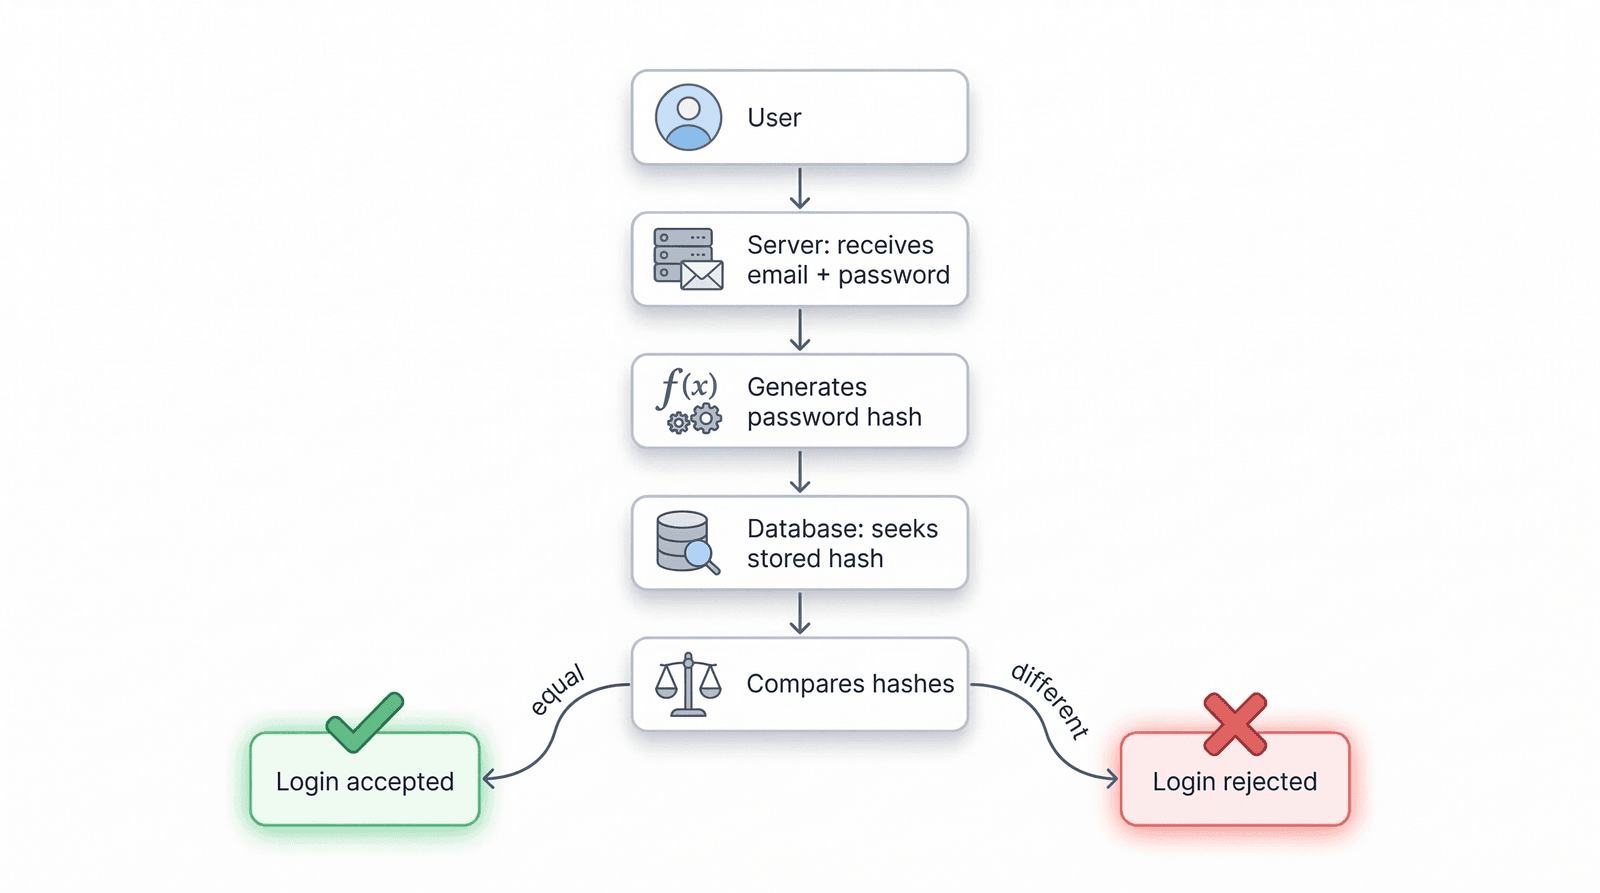
When the user wants to log in, they provide their email and original password. But how is that possible if the password isn't saved in the database?
The server applies the same function used to encode the password during registration to generate a hash from the password entered at login. If the two hashes match, it means the user entered the correct credentials and can therefore be authenticated.
From a hash, it is never possible to determine the original password. To create hashes, libraries such as bcrypt or argon2 are used.
This method has a major security advantage: if someone gains access to the database, they will never be able to access users' passwords.
Another important security consideration: how do we ensure that a given password never produces the same hash?
This is critical to prevent certain attacks that use a table of pre-calculated hashes for common passwords. To avoid this, we use a Salt.
A salt is a random code added to the original password before it is encoded, ensuring that different hashes are always produced. This code is also stored in the database alongside the hash, so it can be used for comparison when the user logs in.
After the authentication process, a JWT token is generated and associated with the user in the application. This token must always be present in every request made to the server, ensuring that the user remains authenticated.
A token is a code made up of 3 parts: HEADER.PAYLOAD.SIGNATURE
Header
The Header contains information about the algorithm and token type, with the following fields:
alg: the type of algorithm used, e.g. HS256 or RS256
typ: token type, in this case "JWT"
Payload
The Payload must include information about the token and the user. Note: this information is never encrypted, so sensitive data (such as a password) must never be included here.
sub: a field that identifies the user in the database, such as an internal ID (a unique identifier code)
iat: token creation date
exp: token expiration date
Signature
Finally, the Signature. This code depends on the Header and the Payload and guarantees that the token has not been altered since it was generated by the server.
A secret key configured on the server is used to ensure the integrity and validity of the token. If the token is maliciously modified, the Signature will detect that it is no longer valid and the server will reject the request.
The token has no concept of state (e.g., active/inactive). It is valid from the time it is issued until its expiration date. Once it expires, the user must make a new authentication request.
Once the token has been generated and returned by the server, it must be stored in the application so that it is available in all future requests to the server.
There are different storage options:
LocalStorage: keeps the token stored even after closing the application. However, it is vulnerable to malicious attacks (e.g. XSS attacks).
SessionStorage: tied to the currently open browser tab. When that tab is closed, the token is deleted. Slightly more secure, but still vulnerable to XSS.
Cookies: an expiration date can be set, making this option more secure. Several options can be configured:
Secure: only allows data to be sent over HTTPS connections
HttpOnly: prevents JavaScript from reading the token, blocking XSS attacks
SameSite: reduces the risk of CSRF attacks
In mobile apps, the system's secure storage can be used, such as Keychain (iOS) or EncryptedSharedPreferences (Android). The fundamental rule is to store the token in a way that prevents malicious scripts from accessing it.
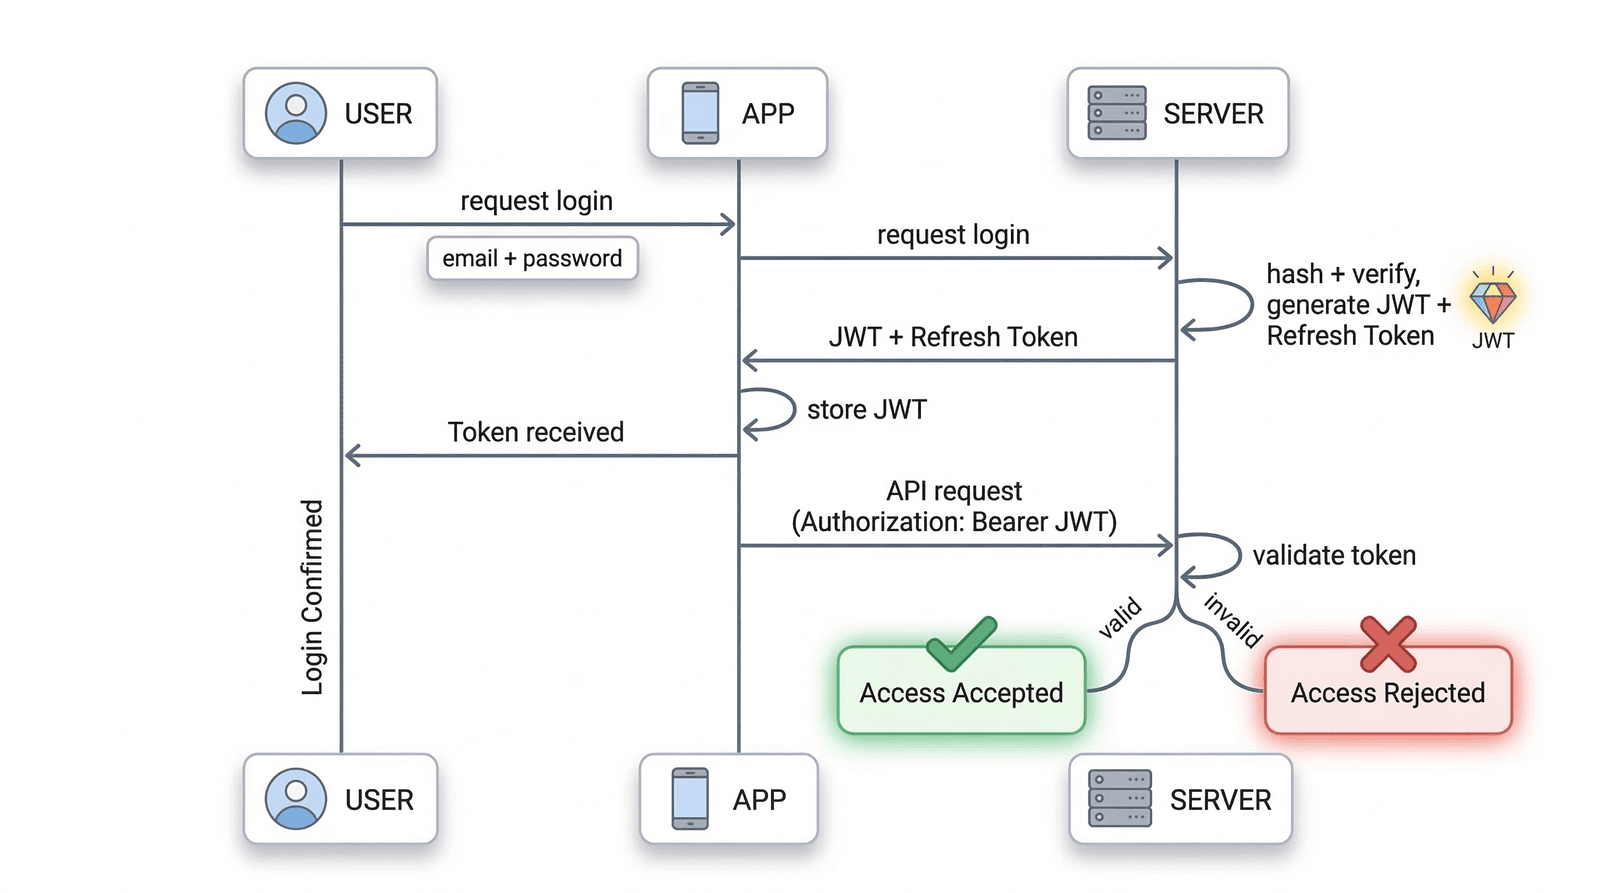
So that the server knows the user is still authenticated, the token must be included in each request. The standard approach is through an HTTP header called "Authorization":
GET /api/my-infoAuthorization: Bearer <TOKEN>
"Bearer" indicates that the header contains an access token. Upon receiving this request, the server will:
Read the token and verify its signature and data (e.g., expiration date)
If valid, the request is authorised
If invalid or expired, the request is rejected (typically with a "401 Unauthorized" error)
Since the token is what keeps the user authenticated and allows operations on their data, security must always be guaranteed.
A token should not remain valid for too long. If an attack occurs and it is intercepted, it could be used to act on behalf of the user and potentially steal their data.
A good practice is to generate short-lived tokens, meaning they expire within a few minutes of being created. This way, even if someone gains access to the token, it will only be useful for a brief period.
However, this creates a complication for the user. If, for example, a maximum validity of 15 minutes is set, the user would need to log in every 15 minutes, which could cause frustration and disengagement from the application.
The solution is the Refresh Token.
A Refresh Token is simply a token with a longer lifespan, used to generate new JWT tokens when they expire, allowing the user to remain authenticated.
The typical strategy:
JWT Token: short lifespan, used in requests to the server
Refresh Token: longer lifespan, generated when the user logs in, stored the same way as the JWT Token
The application flow would work as follows:
The JWT Token expires. Instead of the user having to log in again, the application pauses momentarily (without the user noticing)
The application sends the Refresh Token to the server to generate a new JWT Token
If the Refresh Token is valid, the server issues a new JWT Token and the user remains authenticated. Otherwise, they will need to log in again
Example configuration:
JWT Token: expires in 15 minutes
Refresh Token: expires in 90 days
This means that if a token is intercepted, it is only valid for a very brief window. But the user can remain authenticated for 90 days, as the system continues to generate new access tokens whenever needed.
As mentioned, the token has no concept of state (active/inactive) and there is no built-in function to cancel it if it is intercepted. It remains valid from the moment it is generated until its expiration date. Even if the user logs out of the application, the token remains valid.
However, there are other ways to ensure security.
The simplest way to invalidate a token is to implement a "tokenVersion" field in the database and increment it each time the user logs out. When generating a new token, this field is included in the payload. When the user logs out, the value is incremented and the token becomes invalid.
This system works per user, meaning all previous tokens become invalid when this field is incremented. It is a simple, fast method that does not require storing large lists of all generated tokens.
Each time a user logs out, the token is saved on the server in a list. If a token from this list is used, access can be blocked.
More limited in scope, this method requires storage and a function to regularly clean up the list to prevent it from growing indefinitely.
Redis is a fast in-memory data store that allows stored tokens to be queried very quickly. It also supports automatic TTL (Time to Live), which removes expired tokens without manual intervention.
When the user logs in, the new token is stored in Redis. As long as the token remains in this store, it is considered valid.
Authentication with JWT tokens allows applications to keep users authenticated in a simple and secure way. By following these steps, a robust system can be built where users can keep their data protected.
Security is not a detail — it should be a priority.